Golf Tips

You dont need a perfect swing to be a great golfer!
A great golfer is someone who can:
-
Control the ball flight - Distance, Direction and Trajectory
-
Make good decisions - Club selection - Setup for the shot
-
Handle their emotions - Do not get too low or too high! Most importantly, take care of your attitude!
Aim and Alignment: The club aims to the Target. The body aims parallel (left of the target).
Pre-Shot Routine: Develop your own Routine. Always come from behind the ball - on line to your target. Includes breathing and visualization of your intended shot. Become target oriented!
Practice: Practice is the only way to develop your own skills! Repetition creates skill. Always practice with a purpose.
Putting Drill

Always transfer your weight!
Even the shortest shot in golf requires you to finish with 100% of your weight on your left.
We start with 60% on your left side, then from the top of the backswing (even the shortest backswing, for the shortest shot) transfer your weight to the left, always towards the target.
Straight Back/Straight Through
Most important in the swing!
On the backswing, the club should come straight back to the target line and straight through, through Impact, on the same target line! A great way to achieve that is to practice with a couple of rods on the ground, on line to a target; like shown in the videos below.
A Drill for Posture
Have a good shoulder turn and keep your head still. . . all at the same time!
Make a good posture, hold a golf club behind your neck (like I am demonstrating in the picture) and, with the help of the club, make a shoulder turn, keeping your head still and eyes on the ball.
You can practice this drill at home, training your upper body to repeat a solid turn for a good backswing.

Athletic Posture
In this picture to the left, I am showing a good posture, mainly described as "Athletic."
A good posture is the key for a powerful swing. At the same time, I am showing how a golf club can help you check or correct your alignment. Your body (shoulders, hips, knees and feet) should be parallel to your target line.

Checking your Grip
Are you slicing the ball or fading it to the right? CHECK YOUR GRIP!
Right hand golfer
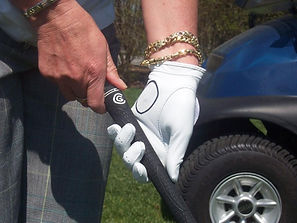
I've drawn a circle on my glove to show you the part of the left hand that is crucial for a good grip. That "fat part," as I call it, has to be resting on top of the shaft and not underneath the shaft. This will end as a weak grip and will keep the club face opened at impact.


This little change in your grip will make a huge difference in your ball flight and you won't miss shots to the right.
Check point: If you use a glove you should be able to see the logo of your glove and it should be pointing diagonally to the right of your target.
Be More Target Oriented - A mental approach to hit shots to the target
The last thing we want in competition is to think about mechanics. We prepare for a tournament by practicing, doing drills focused on short game and long game, and exercising. Many of us also visualize as a way of mental practicing.
When playing in competition, we want to keep easy thoughts; general thoughts like low and slow, pause on the top, a good shoulder turn, etc. Players are all different but I'd recommend that next time you play, instead of thinking about mechanics, try to be more target oriented.


Develop a Pre-Shot Routine
A pre-shot routine becomes your ritual; your own way of approaching each shot. It should become part of you. It should be consistent and it should be unchangeable. The sequence of your routine should repeat over and over, especially under pressure. This mental game, your own game, will keep all the outside distractions away from your intentions. Once you develop your routine, it becomes automatic. Many good players even have a time frame for their routine.
Your pre-shot routine should start from behind the ball and standing on the same line to your target. Standing behind the ball gives you a better visual of your shot.
Pick a spot in front of the ball and on line to your target.
It could be anything that gets your attention; an old divot or a discolored piece of grass. It should be around 2-3ft. Having it close, where you can see it at setup, is KEY! It will help you narrow your focus! Most importantly, it will help you aim and align yourself correctly to the target. Now, visualize your target line and, when addressing to the ball, come with your body parallel to that imaginary line. That "spot" becomes your target! (Not the one that is so far away from you.)
When you are ready to swing, have just one thought in mind - Get the club towards that "spot" and all the way to your finish!
Set Up Chip Shots & Pitch Shots


Drill to Improve Impact


I’ve said before that any part of your body is trainable. This drill will teach your hands and wrists the most powerful position at Impact. For this exercise you will need:
-
Your PW or sand wedge
-
A wooden stick (you can get it at any hardware store for $2.00)
-
A friend to help you with this drill
I believe that by working on your chipping and the positions of your hands at impact and through impact, your long game will improve tremendously. Being in control of your hands to remain “square” at impact will also control the club face from opening or closing at impact! I have no doubt that you will see a better ball flight.


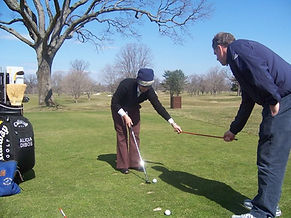
Set up to the ball for a “Chip Shot”
- Weight Distribution: 60% on the left side
- Hand Position: For more control, place your hands a bit lower down the club
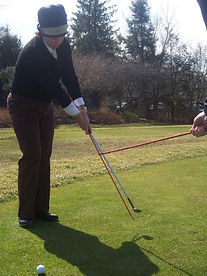
Notice the way we are holding the wooden stick (+/- 2ft. off the ground and 2ft. away from the ball). The idea is to keep the golf club from touching the wooden stick on your finish or follow through.
Check Point: Your left arm and the club should finish as “one long arm” and the clubface staying low.
Wrong Motion: Notice that my left wrist is collapsed and my arms are as well. The club face has changed from being square at impact and I’ve touched the wooden stick.
Question: How often do I need to do this drill?
Answer: As much as you can and until you are in control of your wrists at impact!
Thanks to Mike Durkin, Tournament Director at Winged Foot Golf Club, for helping me with this drill!
Bunker shots and the “Volcano Drill”
Many of my students seem afraid of bunker shots; I want you to feel the opposite! The key is to prove to yourself that you won’t get hurt if you make an explosion in the sand with your sand wedge. I call this drill “The volcano.”
Make a small pile of sand, aka “The Volcano,” as in the photo below, left. Make a smooth swing, as if in slow motion. Let the club make a big explosion against and through “The Volcano” to a full finish. Repeat this motion a few times.


Setting up for a Bunker Shot
Sand wedge - 56, 58 degrees of loft
Ball position - Center but with an open stance (the foot line is aiming left of your target).
Bend your knees much more than normal, like you are sitting more over the ball. This will promote a much steeper angle of approach and will help the club dig into the sand much easier.
Club Face should aim to the target.
Back Swing - Setting your feet open to the target will help the arms follow that same line (should feel like the club is going towards the outside).
The most common mistake that I see with my students is that they don’t turn their shoulders when executing a bunker shot and they also stop immediately after impact. You need to make a big shoulder turn to create a natural momentum of the club without trying to force it into the sand.
I’d say that, besides putting, this shot should be the most relaxed, absolutely tension free, slower, and smoother in motion.
Sinking 4 Footers
Round the clock putting drill to a Tee. Sounds easy, but it’s not. You will have to feel the smoothest stroke possible in order to hit the tee. Once you are on the course, the hole will seem much bigger but emulate the same smooth stroke!


ALICIA DIBOS
Director of Instruction